Followers

Thanks for the comments

Thanks for stopping by, if you have enjoyed what you have seen send me a little note, I love hearing from all of you.

Showing posts with label George. Show all posts

Monday, April 25, 2011

DCWV Challenge....American Pickers


 I was up for a challenge....when I saw this layout sketch at DCVW Diary and the page that was made I wanted to join in. I am trying to branch out the Cricut realm.
sketch savvy
I do love DCWV paper stacks (Ok lets face it I love all paper) I had this pictures from Thanksgiving a from a few years ago thought it would be perfect for this layout.

Here is the DCWV "The Guy Stack" that I used.
  (This pictures is not the greatest it looks red but it is really brown, it is raining again here in STL. Dave Murray said we are not going to see the Sun until Thursday or Friday)
Thank you DCWV for created this stack. I mainly scrap boys things (being the mother of only boys.....it hard to incorporate flowers on their pages)
 Here are all the papers that I used. I love the moustache paper, 
I also used all of these Tim Holtz Distressing inks. (Love the Distressing Inks how did I live without these for so long)


So here my page. I like it I hope you do too. I used George to cut the 4 long pieces, and Doodlecharms to make the little turkey tags
If you would like the file you can go HERE to download it.
How cute is this turkey. I cut it twice so I could pop dot the leg.
I bought another Martha Stewart border punch. IT WAS ON CLEARANCE. This is called a quilt border. I thought is wasn't too feminine  to use on this manly page. The green paper is glossy and when I used the Peeled Paint Distress Ink on it then the image really came out. Looks great. The sticker is Me and My Big Idea (oldie but goodies)


Wish me luck. I may no win but I like how it turned out and I will be using this layout again and visiting Sketch Savvy to get some more great ideas.

Monday, October 4, 2010

BOO! Scary Mailbox

Okay I guess my new obsession is putting vinyl on my mailbox. I was looking at some blogs this weekend and saw some luminaries for Halloween and thought oooooh, I could do my mailbox. So I got up early this morning and decked it out for Halloween, (BTW it is freezing here in STL and about froze my fingers off doing this). I am not a huge Halloween fan and count the days till it passes but I couldn't pass up decorating my mailbox with the vinyl.

I hope this doesn't scare the mailman so much that he won't deliver the mail!


The other side. Scary isn't it. The great thing is I used almost all the cuts because you can use the inside of the eyes too. George and Basic Shapes was great for this I just welded a few circle and ovals together if you really need the file request it but try it yourself it is really easy.If I would of thought about it soon I could of ordered some glow-in-the-dark vinyl. Next year


SYS Thurs<

This is where I have linked my project to this week

Monday, September 20, 2010

Wedding Project

I was asked by a friend to make some tags for the gift table at her daughters wedding that is coming up on New Years Eve this year.
The tag is made from the George Cartridge. There are 3 layers to the tags I wanted them to have some substance to them so I layers the decorative paper between some heavy card stock. Okay to the fun part. The accordion folded medallion in the center (does it have a particular name? What ever they are called they are cute, cute, cute) but let me tell you how I made these cutie pies. Cut a
1 1/2x12 strip of paper then using a Martha Stewart boarder punch on one edge then using the Martha Stewart Scoring Board I scored every 1/2 inch then flipped it over and did the same. Then accordion folded it and glued it into a circle. I cut a 2 inch circle out of some heavy card stock and glued it to the back and embossed the red medallion with my Cuttlebug and the Swiss dott folder (my fav)

 The little heart on the S is covered with those clear Micro glass beads (yes Martha again). These tags will be attached to 5 separate bottles with silver branches coming out the top and the tags will be attached with purple ribbon.

Monday, September 6, 2010

Card Crazy

I never, never, thought I would be a card maker, but here I am making cards. Go figure. I am really proud of myself , because this is all my own. I didn't look to anyone but myself and ALL the paper I have. (I truly have a problem with buying scrapbooking paper) I needed some thank you cards and this is what I came up with. While the layout is the same there are slight  difference in each one.
I entered this card in the Frosted Design Fabulous Friday Challenge

Frosted Designs
Can you see the little branch the owl is sitting on it is from the Home Decor and more Cartridge and the tag is from George. (Good ole George) Oh, yeah, remember all those decorative scissors we bought way back when well I got one out and use it to trim the bottom of the front of the card. Yeah for me. I also used the Swiss Dot Cuttlebug Embossing Folder.Oh, one more thing I used Ranger Distress Ink on the Embossed 3x3 square. :) I off to do some more projects.
  I entered th
Frosted Designs

Thursday, May 6, 2010

Cricut Corsage

Remember way back when for Mother's Day your Dad would get a corsage for your mom to wear on Mother's Day at church. Things are much more casual at church these days, but I decided to make a corsage (or a crossant as my oldest son says) for my Mom that won't die they next day.

I totally scaplifted (or stole however you think of it) this idea from a Cricut Army Demonstrator who was so generous in giving one to me. She had made then for a swap at the Provo Craft Demo Army Training Convention that I was at in Chicago a couple of weeks ago. Everywhere I went people commented on how pretty my flower was.

I wanted to make my own so I went to Hobby Lobby to purchase the fabric, I was determined to only buy fabric.

The orginal designer, cut out the flowers with her cricut, but she said it was really hard on the blade and went throught alot of them cutting out the fabric, you could do this you just need to adhere freezer paper to the back of the fabric before you cut it out with your cricut. I choose to make a template.
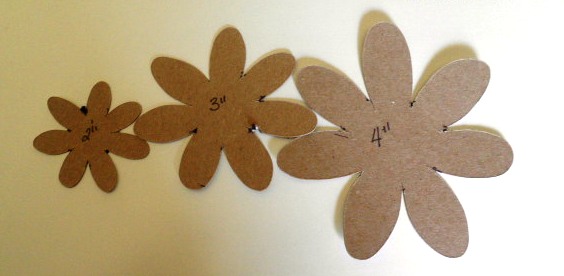
I made a 4", 3",2" and a 1" but the 1" was too small. If I did it again I would start with a 5" flower and go down from there. The flower is from George.

Using a Sharpie Marker (love the Sharpie Marker) I just traced on my fabric. I wanted 4 of each size so each flower has 12 flowers total.

For the backing I just punched some of the cardboard I used to make the templet, then punch holes in the circle to place the pin and hot glued them together.

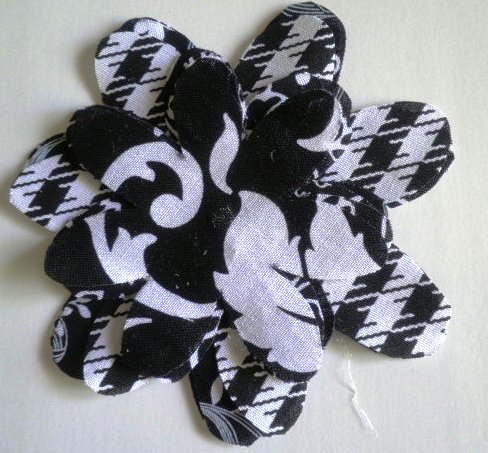
So here is the first layer

second layer


third layer
and.............tah dah!

My finished flower. This does look very handsome on a black sweater. 
The least amount of fabric I could purchase at Hobby Lobby was 1/4 of a yard so with all the mateial left over I couldn't make just one so I made 7 more.
I ran out of white ribbon so I used the pink ribbon (cute huh)
.
Thank you to the lady who made them originally for the Chicago Training I am sorry I met so many people that weekend I totally forgot her name.
Happy Mother's Day to you, and you Oh, and you too.

Sunday, February 14, 2010

Each One Teach One......Scrapbooking that is.

I had a request from our ministers wife if I would spend some time with her daughter and do some scrapbooking with her...of course I jumped at the chance. Morgan had a few pictures and an album and her mother said she loved to do craft project so I was thrilled to be able to have her come over and share some scrapbooking time with me, as her mom and I talked Friday night, she asked how long she should have Morgan come over for I told her from 11 a.m. and pick her around 3 p.m. Leigh Ann thought that was way too long and maybe Morgan would want to do it for only a couple of hours. I agreed and said we would wing it and when she got tired of doing it I would call her and she could pick her up.

I was so excited Saturday morning I had everything prepared for her when she arrived. I had everthing a scapbooker needs to work hard on her album, glue, scissors, paper, chocolate! We arranged her pictures in the order she wanted them placed in her album and got to work.
Here was her first page. I guided her on the first page but the placement was all her.
This page was all Morgan she did a fabulous job with the design and picking the color for the paper. She told me what design she wanted and I designed it for on the cricut and cut it out for her.
If you would like Morgan Peace Signyou may email me and, Morgan gave me permission to share it with her fellow scrapbooker. It is made from the George Cartridge and is 8" in diameter.This was her favorite page that she did. 


Here we are taking a cookie break.
After 5 hours and 10 Pages I finally told her I was tired (I think she would of gone longer but it was getting to be supper time) We had such fun together and we plan to meet once a month so she can keep up with her pictures. I was honored to help Morgan and proud of the hard work she put into her album. I hope that Morgan and I can show you many more pages that she will be doing in the future.

Sunday, January 24, 2010

My Favorite


This is a picture of my youngest son. We have a family joke between my oldest son and myself. He always accuses me of picking our younger son as my favorite and I always agree with him. I tell him why not he is sweet, he gives me lots of hugs and he tells me I am the best mom is the whole world. Why wouldn't he be my favorite. When I saw this picture that I took of him in the car on the way to central IL, we were sitting in the back seat together and he had just woke up. I think that some picture are just better in black and white. You don't get caught up in all the colors and the essence of the picture comes out.


The frame I created in Design Studio. Sometimes when you design thing the cut comes out way different than what you think. I didn't realize when I designed this that it would come out in two pieces (the inside frame is  seperate from the outside frame) I probably need to rework it but at the time I was in a the scrapping mode. I used the Opposite Attracts cartridge for the letters and just used a black pen to out line the letters. I used rub ons for his name on the picture itself. The paper is from Basic Grey's Urban Prairie collection. Look at the cute little bee in the corner :)

Friday, January 22, 2010

Bubble Mesh Layout

I had a very productive croppping weekend and so I am going to show you some of the fruit of my labor in my next few posts. In this layout I used the Bubble Mesh I created a few months ago. I hope this inspires you to use this mesh if you do send it to me and I will post it here.

Here is the close up of the details

Are you wondering what Dogtown is? St. Louis has alot of ethic neighborhood, the Italian section is called The Hill and the Irish section is called Dogtown (I can't remember why) they have a big parade for St.Patrick's day. It is more of a neighborhood parade but it is huge and goes on forever. Thousands of people show up for the parade and big parties. Alot of beer and bagpipes!
PS ......if you would like the mesh just leave your email in the
comments and would be happy to send it to you.


Sunday, January 3, 2010

Retro Bubble Mesh

This is a mesh I created when I saw some doodling templets from Crafter's Workshop. The templets are made from the plastic that you make stencils out of. They are very cool and you can use them with the inks that you put in a spray bottle. (Something else to buy!) I loved the circle inside the circle and knew I could recreate it on my Design Studio and my Cricut. The Cartidge I used is George and is to be cut out on an 12x12 mat.
Here is the screen shot


and then the final result.


 Just click on the Title and you can download the file.
Enjoy!

Wednesday, December 23, 2009

Our Genuine boy

This is the the last of the 12x12 picture frames I made for Christmas presents. This one is for my other great-nephew Connor. I had purchased a rub on that had the title on it with lots of little boy sayings they were all just perfect for him. He has such a big personality I thought the big C fit him perfectly. This is my favorite out of all the frames that I made.                                  

This is a close up of the corner and this is a better representation of the color of the paper that was used. The C was made with the Lyrical Letter Cartridge

Tuesday, December 22, 2009

More Handmade Christmas

This is another picture frame that I made for my great nephew James for Christmas. Today is his 2nd birthday and he was born near North Pole, Alaska. He lives a lot closer now which is wonderful that we will be able to see him grow up. I used the pattern that RUELYSI has on her blog. She has made so many great animals for the DS and I knew I wanted to use her penguin: it is so cute. Here is the link to her blog ruelysicreativecards if you down load a file please be kind and leave her a thank you it is the least you can do for all her beautiful and hard work

This is the close up of Ruelysi adorable penguin, and so easy to make. Thanks Ruelysi!

Monday, December 21, 2009

Handmade Christmas Gifts

OUR GRANDKIDS
I have never had an orignal  idea. I saw a picture frame like this one at Archivers, but always having my mothers mantra in the back of my mind ("There is always a cheaper way"). I found some 12x12 frames at Michael's they were $4.99 on sale and I had a 20% off coupon but I splurged on the paper, I felt this paper went so well with my sister-in-laws living room. The picture openings are  4x4. I made the pattern with my Cricut Design Studio. I made 4 frames in total and will share some more over the next few days.
              
This is a close-up of the the decorative 4x4 square. My brother-in-law and sister-in-law have 2 grandson's with another on the way this spring. They are so proud of them. I know they will enjoy placing their pictures in this frame for all to see.


Sunday, October 18, 2009

Bubble Mesh

I have had some down time to do some creating in my Design Studio so after doing some blog surfing I saw this mesh and fell in love with it and decided I could make it myself. I would love to share this with you all you need do is ask.
Here is the great thing look at this great design from the left over. You have 32 circles and cute little diamonds to use also. Bonus!

Wednesday, October 14, 2009

Halloween

Last year my son was a made scientist for Halloween. We had alot of fun finding all the things for his costume.

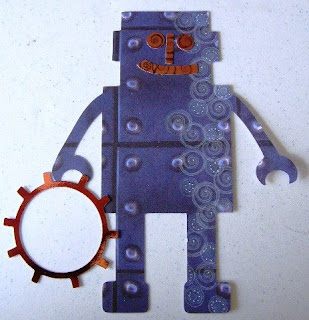
I used my robot file I made earlier this year for this page it worked out great. Here is the file if you would like
http://www.mediafire.com/file/ay1zjvjnudz/robot.cut
Leave me a message if you download. It is the polite thing to do :) and check back often I am making some new DS files they are ultra cute.

Friday, April 17, 2009

Mother and Child

Thanks to all who left a comment on the mother and child cut file. If and when you use the design please send me a pictures so I can post it here on my blog.

Thursday, April 16, 2009

Mother and Child Cut File


I am going to post my cut file for the mother and child cut file for a 24 hour period so any one who visit my blog will be rewarded with immediate access to the file. Let the count down begin.

Monday, March 9, 2009

Boys stuff

I was looking at blogs the other day and saw a robot for a boys scrapbooking page. There are so many cute and great ideas for the girls in your life, but a lot of boys ideas are few and far between so I decided to make a cut file for a robot. I stamped him with StazOn Opaque white I thought the white would be more opaque, I used a white Marvy marker to accent. I haven't quite decided how I would use him in my scrapbooking but I thought he turned out cute.
I will be happy to send you the cut file just leave the message
Related Posts Plugin for WordPress, Blogger...